
Overview
This guide shows you how to install your ConnectLoop AI agent by adding the embed code directly to your website's HTML.
This method works for any website platform that allows you to edit HTML or template files.
Prerequisites
Before you begin, make sure you have:
- Access to your website's HTML file or template editor
- Your ConnectLoop embed code, e.g.:
<script
  src="https://agents.connectloop.ai/widget.js"
  data-company-id="your-company-id">
</script>
Get your ConnectLoop embed code
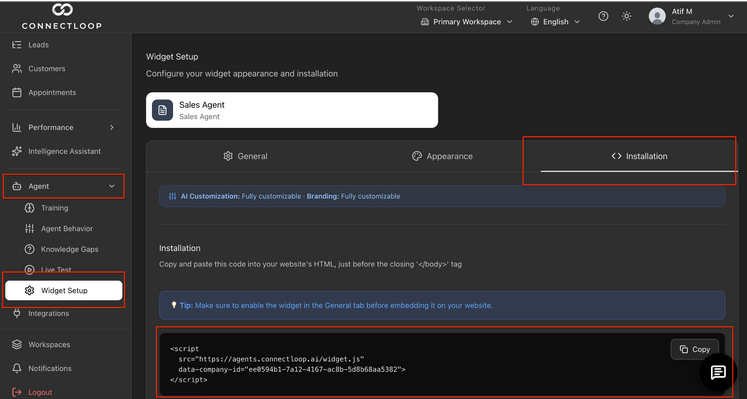
Step 1: Access Your Website Code
Open your website's HTML file or template where you want the widget to appear.
This is typically:
- Your main layout file
- A global template file
- Or your website builder's custom code section
Step 2: Locate the Closing Tag
Find the closing </body> tag in your HTML.
This is usually at the bottom of the file.
Step 3: Paste the ConnectLoop Code
Paste your ConnectLoop embed code just before the closing </body> tag.
Example:
...
<!-- Other website code -->

<script
  src="https://agents.connectloop.ai/widget.js"
  data-company-id="your-company-id">
</script>

</body>
Make sure you paste the entire code exactly as provided and do not modify it.
Step 4: Save and Publish
- Save your changes
- Publish or deploy your website
Step 5: Verify Installation
- Open your website in a new tab
- Refresh the page
You should now see your ConnectLoop widget appear on your site.
What Success Looks Like
- The widget appears on your website
- You can open it and start a conversation
- Leads and conversations begin appearing in your ConnectLoop dashboard
Common Issues & Fixes
The widget is not showing
Check the following:
- The code is pasted before the closing
</body>tag - The code is pasted correctly and completely
- Your changes were saved and published
- You are viewing the live site, not a preview
I cannot find the tag
This usually means:
- You are not editing the main template file
- Your platform uses a visual builder instead
In this case, use one of the platform-specific guides instead (WordPress, Wix, Shopify, Hostinger).
Changes are not appearing
This is usually caused by caching:
- Clear your website cache
- Try opening your site in an incognito window
Important Notes
- This method works for any platform that allows HTML editing
- The code must be placed before the closing
</body>tag - You only need to install this once
Need Help?
If you run into any issues, try chatting with our guide agent inside the portal. You can also reach out to our support team at [email protected], and we'll help you get everything set up.
If you are using a website builder, you may find it easier to follow a platform-specific guide instead (WordPress, Wix, Shopify, or Hostinger).